Purpose #
In this topic you will explore how to create all sheets necessary for our weekly ordering production with BEC.
These sheets are the foundational structure used across multiple departments to ensure things run as a smooth machine. In targets we will break down each specific google sheet you will be learning about.
Targets #
Upon completion of this topic you will be able to confidently create & edit the following google sheets:
- Weekly Order Master Sheet;
- Daily Packing Slips & Invoices Sheets;
- Bi-weekly Account Statement Sheet
- Rotating Menu Order Sheet
Master Sheet Overview #
The order master sheet is where we store all of the weekly store order information. This sheet contains tabs for multiple formula functions to ensure information is seamlessly calculated for all allocations within administration and production.
This information includes:
- specific items ordered
- PO numbers of orders
- volume of items sold
- Prep sheets for production
- Bagging sheets allocated by store and delivery day for production packing
- invoices for the Gastown location as they are on a different payment program from the other stores. Their payments are processed immediately when orders are placed as opposed to the other stores who accrue their orders for bi-weekly payment processing.
This sheet is created weekly, in advance, for the following week’s orders.
Play the video below to see a visual representation of all sheet tabs
NOTE: Information inputted onto the Master Sheet is used to auto populate the packing slips sheet, invoices sheet & the account statement sheet
Master Sheet Expanded #
Screenshot & explanation of each type of tab contained on the Master Sheet
In this step, we will take a closer look at the tabs of the Master Sheet and how they are used in the Ordering and Billing process for Body Energy Club.
There are 4 types of sheets in the Master Sheet:
- Master – Orders sheet
- Bagging sheets
- Prep Sheet
- Gastown Invoices
Master – Orders sheet
This tab contains information about every single order made by every BEC location. This is the sheet we enter the quantity of the products ordered from each order email. This will be discussed later on in the Order Fulfillment step.
Information entered into this sheet gets auto-filled into many other fields and documents, and all of the relationships will be discussed further down the road.

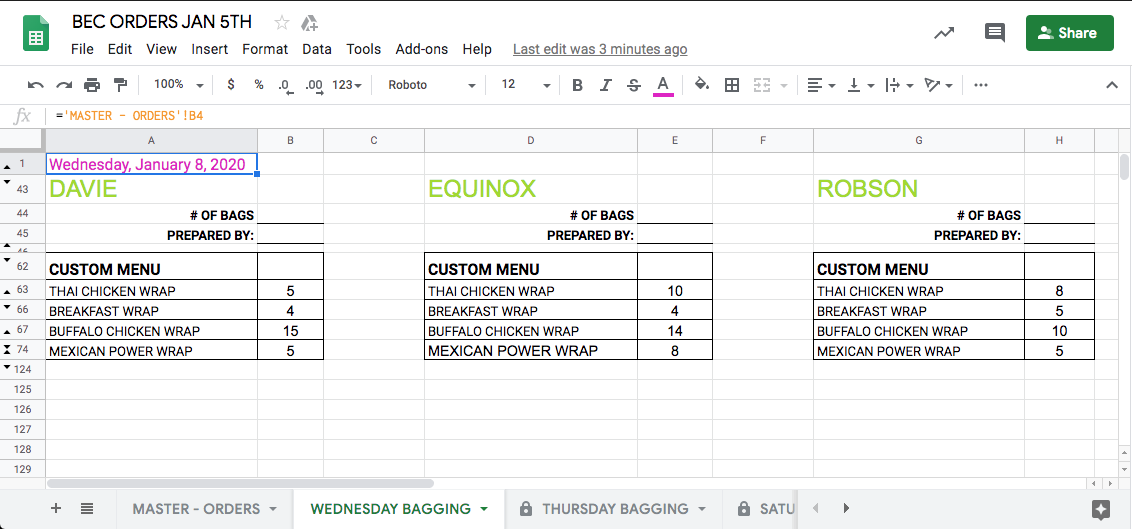
Bagging Sheets
These sheets specify the breakdown of the orders between different stores and delivery days. These sheets used to make sure the correct amount of dishes are sent to the correct location. All of this information is auto-filled from the Master – Orders sheet.
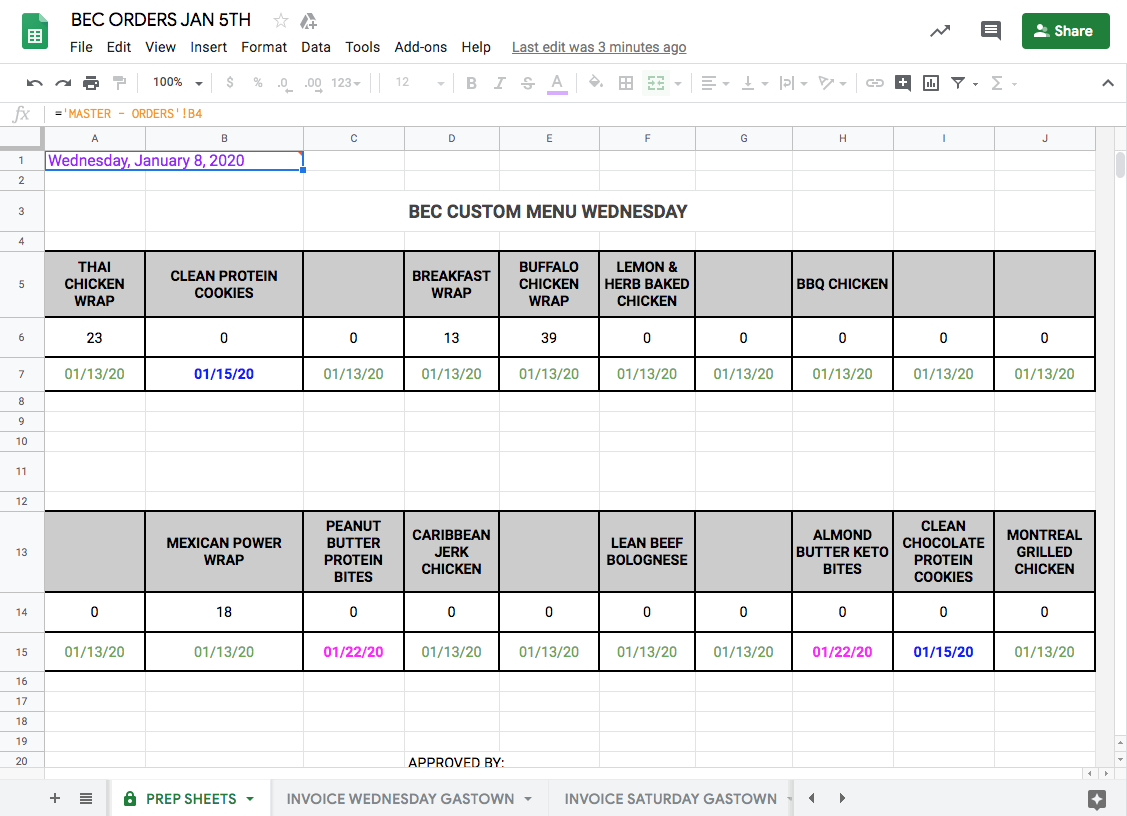
Prep Sheet
This is the sheet that is used by the Kitchen BEC team when cooking the dishes. Here they can see how many of each item they have to prepare and the expiration date of each item. Again, this info is auto-filled from the Master – Orders sheet.
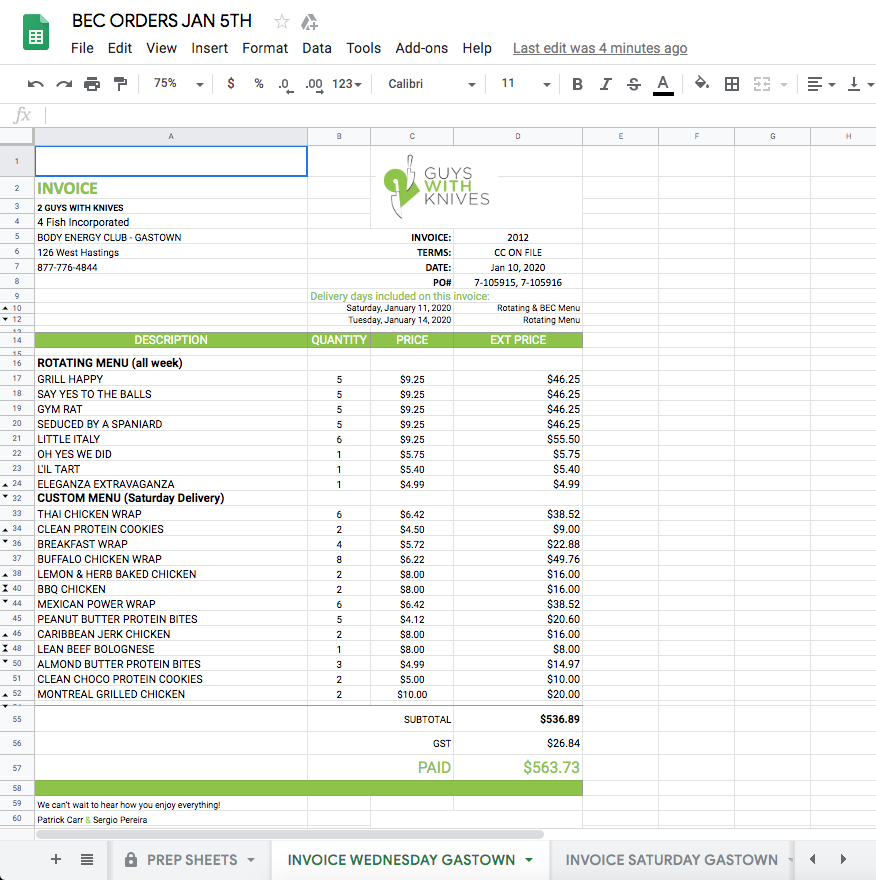
Gastown Invoices
Gastown BEC store has a bit of a different billing structure, that’s why its Invoices are located in the Master Sheet. They look like any other Invoice in the process, but they have to be built order – to order, instead of at the end of the billing cycle. Like any other invoice, they have the quantity of items ordered, item price, total exit price, subtotal, gst and total values.
Now you know what each of the tabs in the Master Sheet is for and how it is used in this process.
Master Sheet Creation #
Creating the weekly Master Sheet is a simplistic flow that you will have no trouble learning. The great thing about this process is that the Master Sheet template is already created – all you need to do is make a copy and format it for a new week.
Yay for tutorials
Follow the steps below to become the next Master Sheet Superstar
- Navigate to the sales folder in google drive (google drive – sales – previous week’s sales folder). For this example, we will use December 15th.
- Inside of the previous week’s sale’s folder, click “wholesale,” then “BEC,” and then double click the “BEC Sales” google sheet document to open it
- On the open google sheet document, click “file” and “make a copy”
- Here you will edit the name. Delete the “copy of” text and edit the date to the week it will be used for, example: BEC ORDERS DECEMBER 22ND
- In the folder field, navigate back using the arrow until you return to the sales folder. Select the appropriate month, in this case, October, the appropriate week, in this case, October 6th, the subfolder “wholesale,” and the secondary sub folder “BEC.” Click “select” and then “ok.” This will save the document in the correct folder and launch it. You are now in the new document and you can close the Sept. 29th sheet as you will continue to work in the new week’s sheet.
Now that you’ve effectively created and saved the document, it’s time to format it correctly for the sales week. Continue with the steps below to do so.
- Rename the 5 rotating menu entrees with the correct entree names from the new week’s menu. Ensure that these are entered in the same order that they appear on the menu. All other dish names on this sheet will remain the same as they are from the BEC custom menu.
- Clear the numerical volume values of each of the dishes so that it is a blank slate for the new order numbers.
- Clear the PO numbers so it is a blank slate for the new orders
- Change the dates for each of the delivery dates for the Davie Store. When you change Davie’s dates, it will auto populate for the other stores below.
Congratulations, you did it!
Packing Slip & Invoice Sheet Overview #
The Packing Slips & Invoice Sheet works directly in tandem with the Master Sheet and are linked together using the Master Sheet URL.
The Master Sheet is used internally only, whereas the packing slips and invoices are documents generated for the stores.
The URL link allows the order information collected on the Master Sheet to auto populate the packing slips and invoices for each corporate store for each delivery day and the packing slips only for each franchise store.
Pretty cool, huh?
The reason for the difference between the corporate stores and franchise stores is because they are on different billing program guidelines which we will discuss later on.
As this sheet contains the documents for the entire weekly order cycle, there are many tabs.
The tabs are of 2 types, Packing Slip and Invoice. Here is a brief explanation of each.
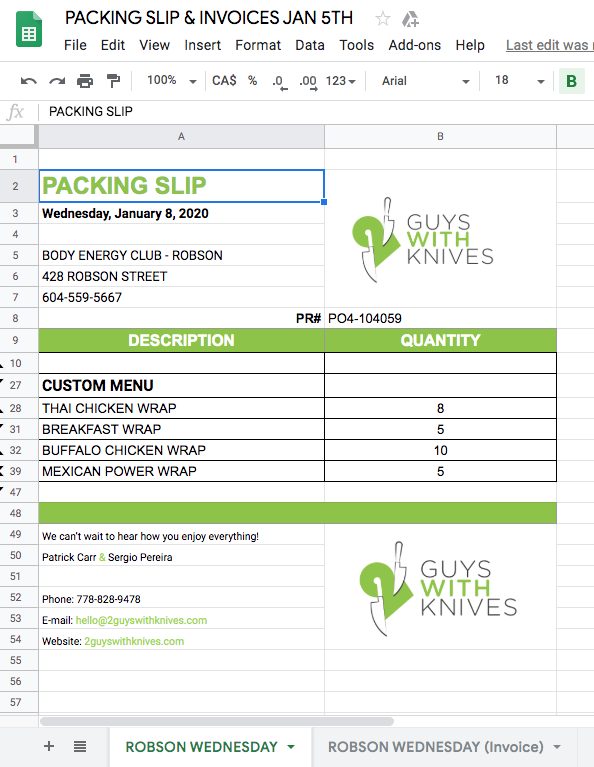
Packing Slip
A Packing Slip looks like the screenshot below and is used to keep track of the items ordered by each store. It is also emailed to each store on the day of the Delivery to simplify the delivery process.
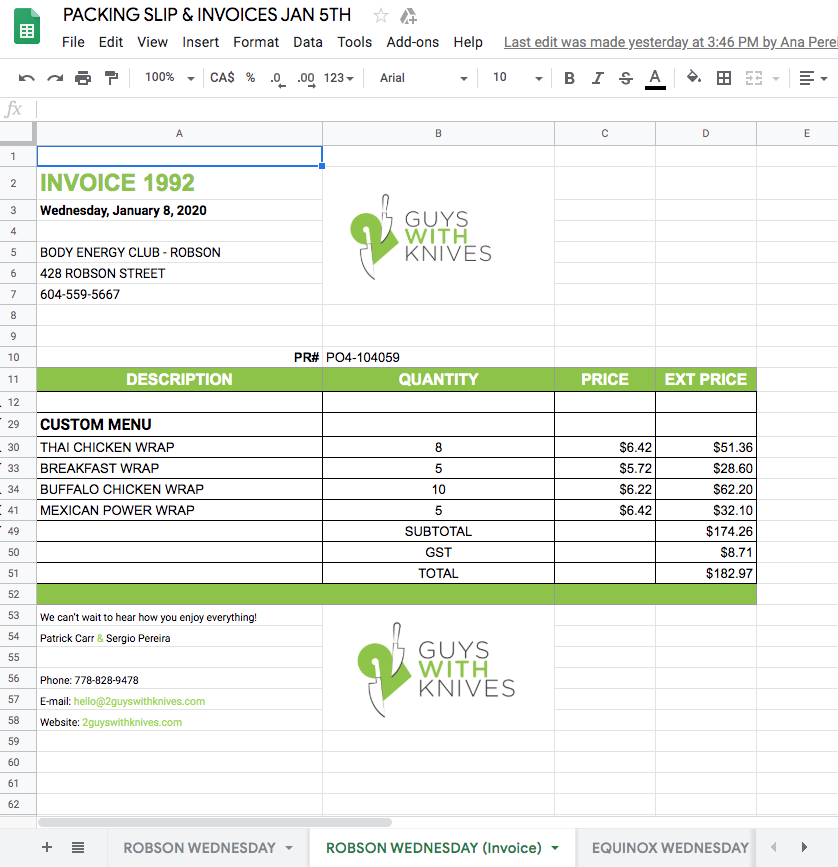
Invoice
An Invoice looks like the screenshot below and is used to track the financial side of the process. As such, it has the Quantity ordered, individual Item Price and the total Exit Price for each of the order lines. It also has the Subtotal, GST and Total values.
The tabs included on this sheet, in order of appearance are:
- Robson’s Wednesday Packing Slip
- Robson’s Wednesday Invoice
- Equinox’s Wednesday Packing Slip
- Equinox’s Wednesday Invoice
- Davie’s Wednesday Packing Slip
- Davie’s Wednesday Invoice
- Davie’s Thursday Packing Slip
- Davie’s Thursday Invoice
- W Cordova’s Thursday Packing Slip
- W Cordova’s Thursday Invoice
- W 4th’s Thursday Packing Slip
- W Broadway’s Thursday Packing Slip
- Burnaby’s Thursday Packing Slip
- Burnaby’s Thursday Invoice
- Gastown’s Thursday Packing Slip
- E3rd’s Thursday Packing Slip
- E3rd’s Thursday Invoice
- Cambie’s Thursday Packing Slip
- Cambie’s Thursday Invoice
- Robson’s Thursday Packing Slip
- Robson’s Thursday Invoice
- Equinox’s Thursday Packing Slip
- Equinox’s Thursday Invoice
- Coquitlam’s Thursday Packing Slip
- Gastown’s Saturday Packing Slip
- W 4th’s Saturday Packing Slip
- W Cordova’s Saturday Packing Slip
- W Cordova’s Saturday Invoice
- E3rd’s Saturday Packing Slip
- E3rd’s Saturday Invoice
- Burnaby’s Saturday Packing Slip
- Burnaby’s Saturday Invoice
- Davie’s Saturday Packing Slip
- Davie’s Saturday Invoice
- W Broadway’s Saturday Packing Slip
- Coquitlam’s Saturday Packing Slip
- Robson’s Saturday Packing Slip
- Robson’s Saturday Invoice
- Cambie’s Saturday Packing Slip
- Cambie’s Saturday Invoice
- Equinox’s Saturday Packing Slip
- Equinox’s Saturday Invoice
- Robson’s Tuesday Packing Slip
- Robson’s Tuesday Invoice
- Robson’s Tuesday Rotating Menu only Invoice
- Gastown’s Tuesday Packing Slip
- E3rd’s Tuesday Packing Slip
- E3rd’s Tuesday Invoice
- E3rd’s Tuesday Rotating Menu only Invoice
- Coquitlam’s Tuesday Packing Slip
- Burnaby’s Tuesday Packing Slip
- Burnaby’s Tuesday Invoice
- Burnaby’s Tuesday Rotating Menu only Invoice
- Cambie’s Tuesday Packing Slip
- Cambie’s Tuesday Invoice
- Cambie’s Tuesday Rotating Menu only Invoice
- Davie’s Tuesday Packing Slip
- Davie’s Tuesday Invoice
- Davie’s Tuesday Rotating Menu only Invoice
- W Broadway’s Tuesday Packing Slip
- Equinox’s Tuesday Packing Slip
- Equinox’s Tuesday Invoice
- Equinox’s Tuesday Rotating Menu only Invoice
- W Cordova’s Tuesday Packing Slip
- W Cordova’s Tuesday Invoice
- W Cordova’s Tuesday Rotating Menu only Invoice
- W 4T
- Credit Memo
- URL Link
Packing Slip & Invoice Sheet Creation #
Creating the Packing Slip & Invoice Sheet is smooth sailing as it contains many similar steps to the Master Sheet Creation.
Follow the steps below to learn this process:
- Navigate to the sales folder in google drive (google drive – sales – previous week’s sales folder). For this example, we will use Dec 29th.
- Inside of the previous week’s sale’s folder, click “wholesale,” then “BEC,” and then double click the “Packing Slip & Invoice” google sheet document to open it
- On the open google sheet document, click “file” and “make a copy”
- Here you will edit the name. Delete the “copy of” text and edit the date to the week it will be used for, example: PACKING SLIP & INVOICES OCTOBER 6TH
- In the folder field, navigate back using the arrow until you return to the sales folder. Select the appropriate month, in this case, January, the appropriate week, in this case, January 5th, the subfolder “wholesale,” and the secondary subfolder “BEC.” Click “select” and then “ok.” This will save the document in the correct folder and launch it. You are now in the new document and you can close the Dec. 29th sheet as you will continue to work in the new week’s sheet.
Now, let’s edit the appropriate fields to make the file work:
- Navigate to the URL tab of the Packing Slip & Invoice Sheet
- Copy the URL from the January 5th MASTER SHEET (created via previous step) and paste it into the URL field of the Packing Slip & Invoice Sheet
- Navigate to the first tab, which is Robson’s Wednesday Packing Slip
- Click the field beside “PR#” and click “Allow Access.” This will link the sheets together and auto-populate the information accordingly.
Yay, you did it!
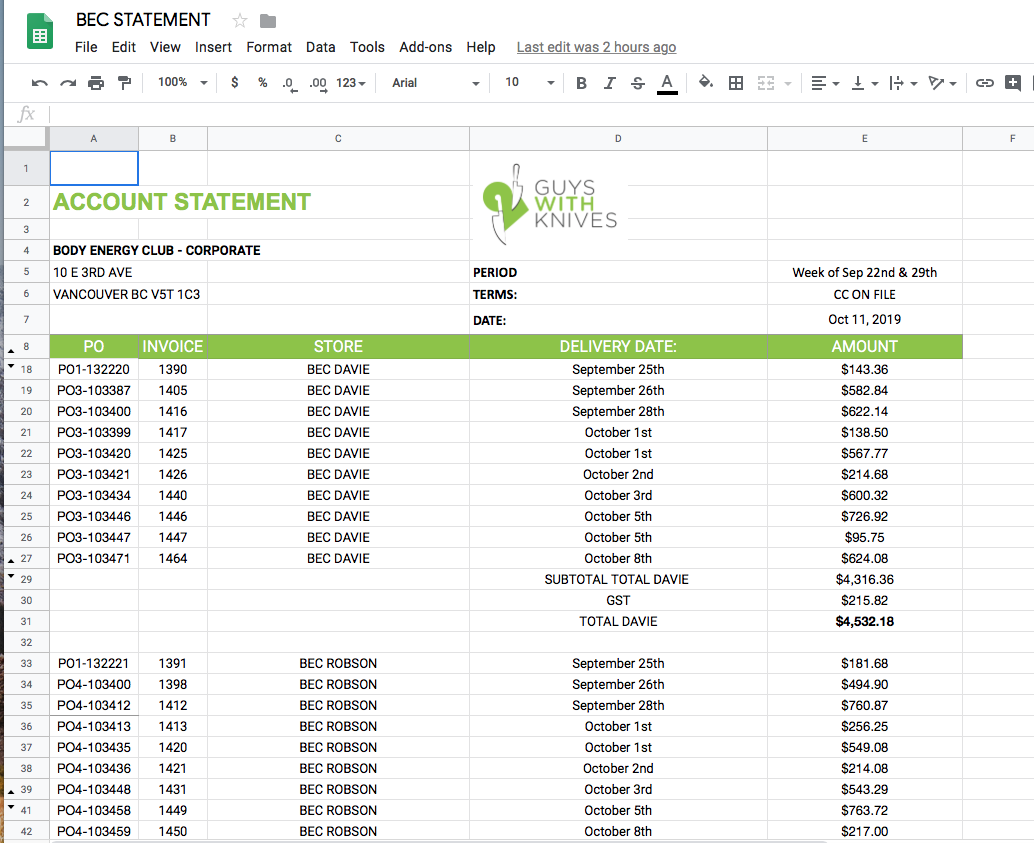
Statement Sheet Overview #
The Statement sheet is a documented reference of each corporate store’s order history throughout the bi-weekly order cycle. This document is emailed to BEC at the end of the order cycle for them to conduct their internal comparisons and tracking. An account statement sheet is not created for the Franchise Stores.
The information included on the statement is:
- PO number of each order on the billing cycle
- Invoice number of each order on the billing cycle
- Amount owed for each delivery for each store based on the PO and Invoice
The Statement sheet is completed throughout the bi-weekly billing cycle and therefore the sheet must be created prior to the billing cycle beginning. All information is currently inputted manually so it is imperative that you are thorough and pay close attention to detail.
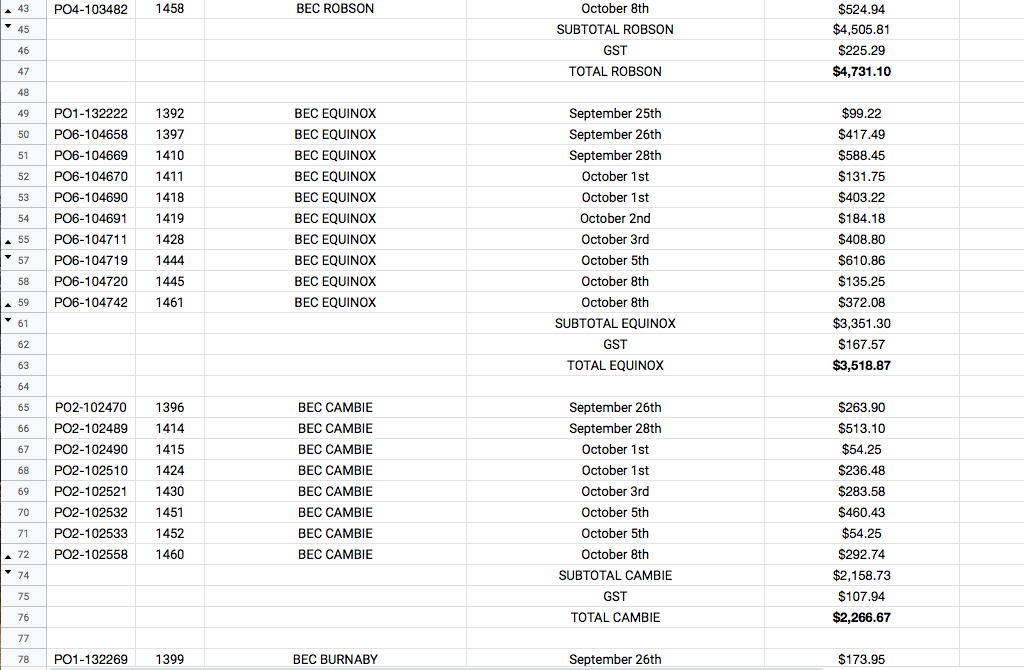
Below is a visual representation of a completed billing cycle statement.

Statement Sheet Creation #
Creating the Statement Sheet is smooth sailing as it contains many similar steps to the Master Sheet Creation and Packing Slip & Invoices Sheet Creation.
Follow the steps below to learn this process:
- Navigate to the wholesale folder in google drive (google drive – wholesale – BEC folder – Billing & store Info – Account Statements – BEC Statements). For this example we will use the billing cycle of October 6 & 13th to create the sheet for October 20th & 27th.
- Once you’ve opened the sheet, navigate to the most recent Statement in the sheet (in this case, October 6th & 13th) by selecting from the tabs at the bottom of the sheet;
- Click the arrow on the right of the statement tab and click “duplicate.”
- On the tab of the copy you’ve just created, click the right hand arrow, click “rename” and enter the name of the new billing cycle – In this case “NEW STATEMENT OCT. 20TH & 27TH.” Ensure the “copy of” text is removed.
- Now, select the period field and update the date information
- Clear the PO Number, Invoice and Amount fields so that they are a blank slate for the new cycle.
- Change the dates manually to align with the new dates for each delivery.
Congrats, you did it!
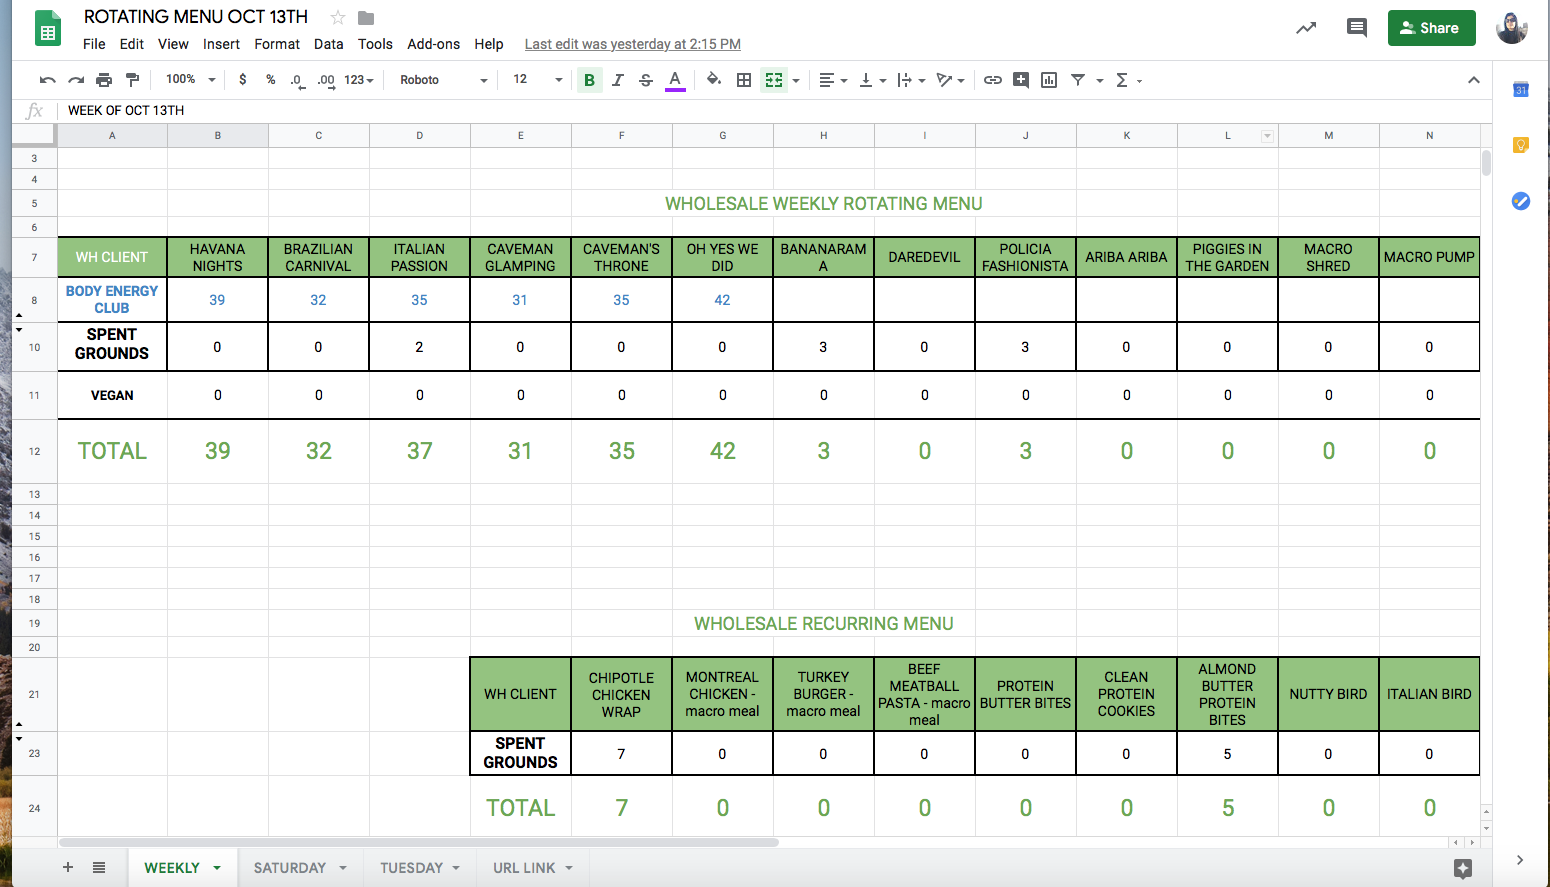
Rotating Menu Order Sheet Overview #
The Rotating Menu sheet is a documented reference of the total weekly order volume of each 2 Guys rotating menu item as well as how this volume is allocated amongst each delivery day.
The weekly rotating menu order is placed on Wednesdays for the upcoming week and therefore this sheet is prepared weekly on Wednesdays once that order is received.
This sheet is printed for:
1: Administrative Team: The first tab is printed so that the Administrative Team can check the total volume ordered of each dish. They will use this information to print the correct number of labels for each dish for the production team.
2: Kitchen Team: The second tab (Saturday’s delivery) and third tab (Tuesday’s delivery) are printed so the Kitchen Team has the exact volume ordered of each dish for each delivery day. This enables them to prepare and produce the correct quantities for each day.
The information included on the rotating menu order sheet is:
- Total volume of each dish ordered for the week
- Designated dish volume for Saturday’s delivery
- Designated dish volume for Tuesday’s delivery
- The URL link from the Master Sheet
Below is a visual representation of a completed Rotating Menu Order Sheet.
The first tab gives us the total weekly volume of each rotating menu dish that BEC & Spent Grounds order:
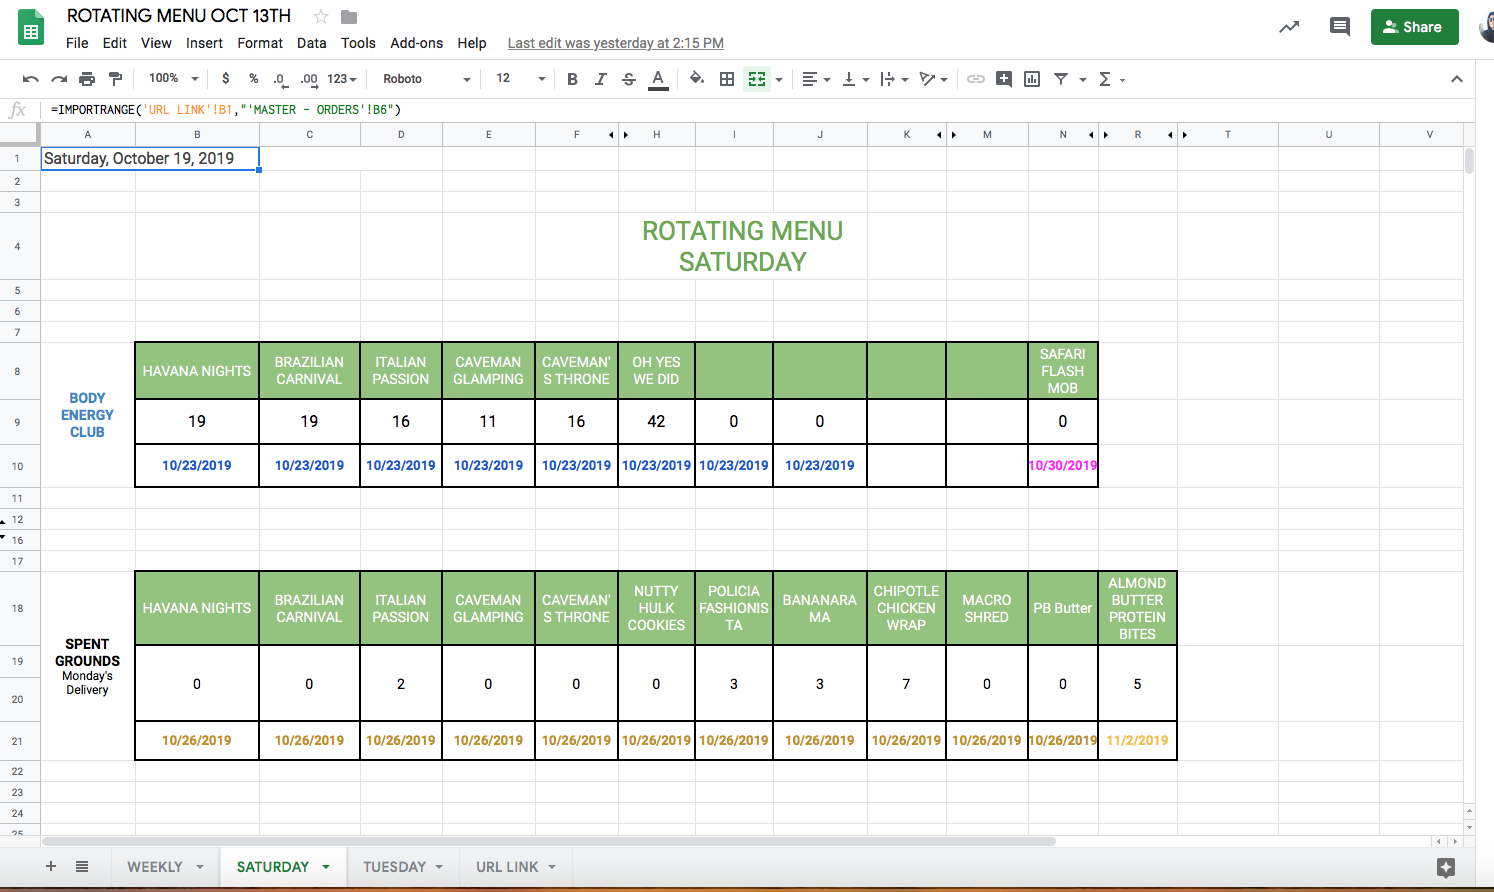
The Second tab shows the designated volume of each dish ordered for Saturday’s delivery, including the best before date for the Kitchen Team to sticker onto the packaging. The best before is the date listed directly below the order volume of each dish.
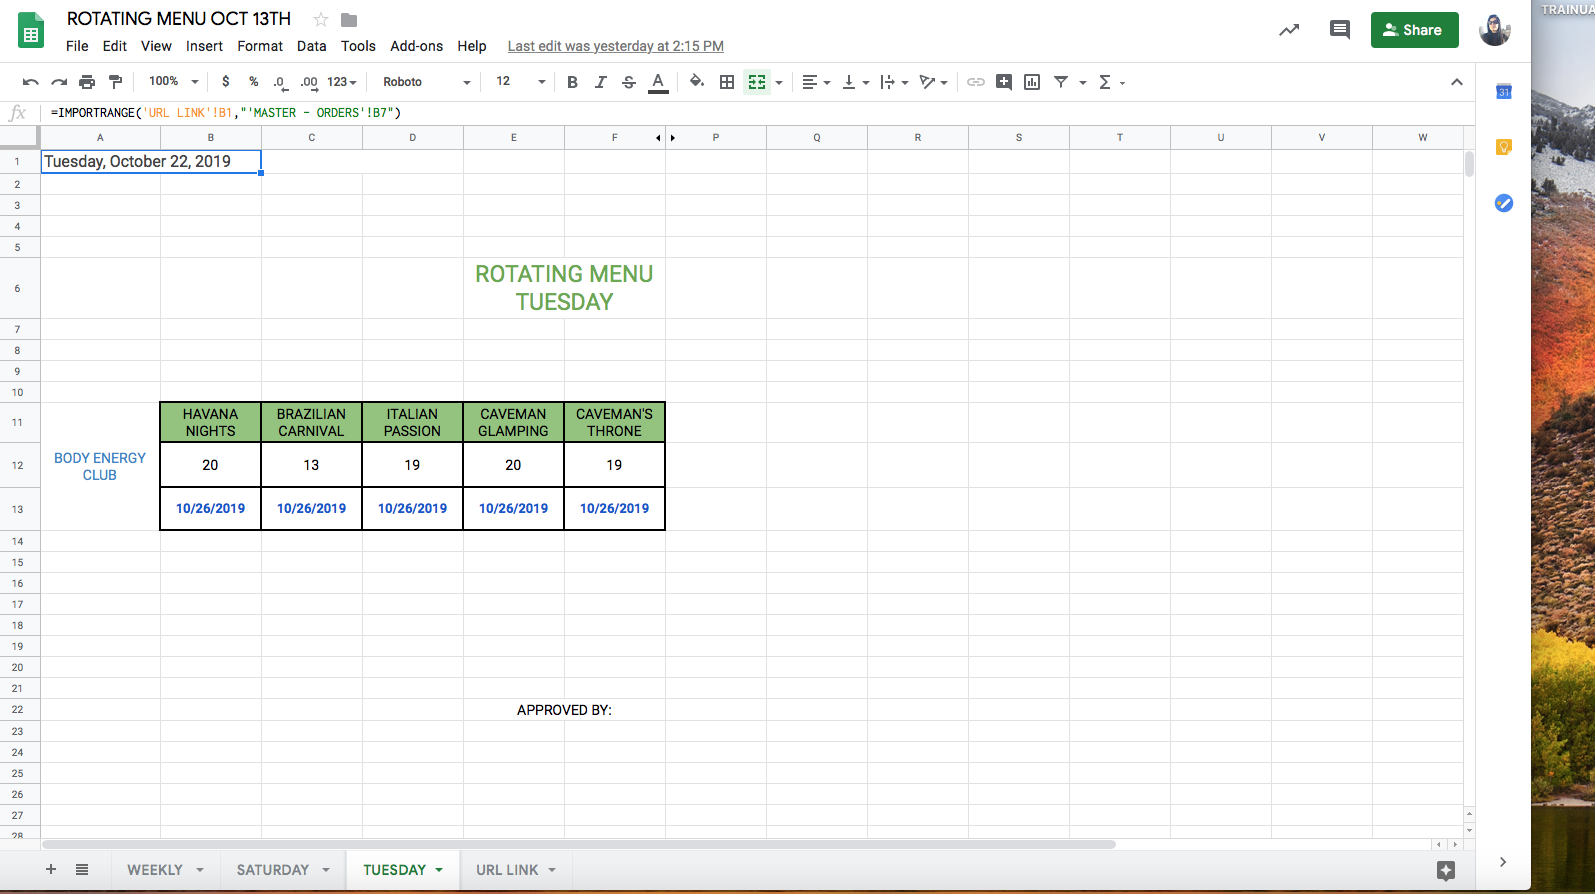
The third tab is the designated dish volume for Tuesday’s delivery. This is BEC only as Spent Grounds does not receive a Tuesday delivery. It also includes the best before date for the Kitchen Team to sticker onto the packaging. The best before is the date listed directly below the order volume of each dish.
The fourth and final tab is the URL link. This is copied and pasted the Master Sheet. Drag the link from column B through column Z:

Rotating Menu Order Sheet Creation #
Creating the Rotating Menu Order Sheet is a simple flow that you will have no trouble learning. The great thing about this process is that the Rotating Menu Sheet template is already created – all you need to do is make a copy and format it for a new week.
Follow the steps
- Navigate to the sales folder in google drive (google drive – sales – previous week’s sales folder). For this example, we will use January 5th.
- Inside of the previous week’s sale’s folder, click “wholesale,” then double click the “Rotating Menu” google sheet document to open it
- On the open google sheet document, click “file” and “make a copy”
- Here you will edit the name. Delete the “copy of” text and edit the date to the week it will be used for, example: ROTATING MENU JAN 5TH
- In the folder field, navigate back using the arrow until you return to the sales folder. Select the appropriate month, in this case, January, the appropriate week, in this case, January 11th, the subfolder “wholesale,” Click “select” and then “ok.” This will save the document in the correct folder and launch it. You are now in the new document and you can close the January 5th sheet as you will continue to work in the new week’s sheet.
Now that you’ve effectively created and saved the document, it’s time to format it correctly for the sales week. Continue with the steps below to do so.
- Rename on the top of the file January 11th.
- Navigate to the URL Link tab
- Copy the URL from the January 11th BEC MASTER SHEET and paste it into the URL field of the Rotating Menu Order Sheet and extend for all columns, “a” to “z”
- Navigate to the first tab, which is Weekly
- Click the field beside “PR#” and click “Allow Access.” This will link the sheets together and auto populate the information accordingly.
*All the information from the BEC Master Sheet will automatically auto fill onto this sheet, however you will need to manually enter the information for Spent Grounds.
Done 🙂


